Like any document, it is easiest to make a Google Doc accessible for digital distribution when you plan to do so from the start.
As an alternative to the tutorial below, view the YouTube Google Docs Accessibility how-to videos.
Structuring Content with Paragraph Styles
Outline View
Provide Text Equivalents with Alt Text
Using Columns
Creating Accessible Tables
Provide Descriptive Hyperlinks
Run an Accessibility Check
Exporting and Downloading Google Doc
Additional Resources
Structuring Content with Paragraph Styles
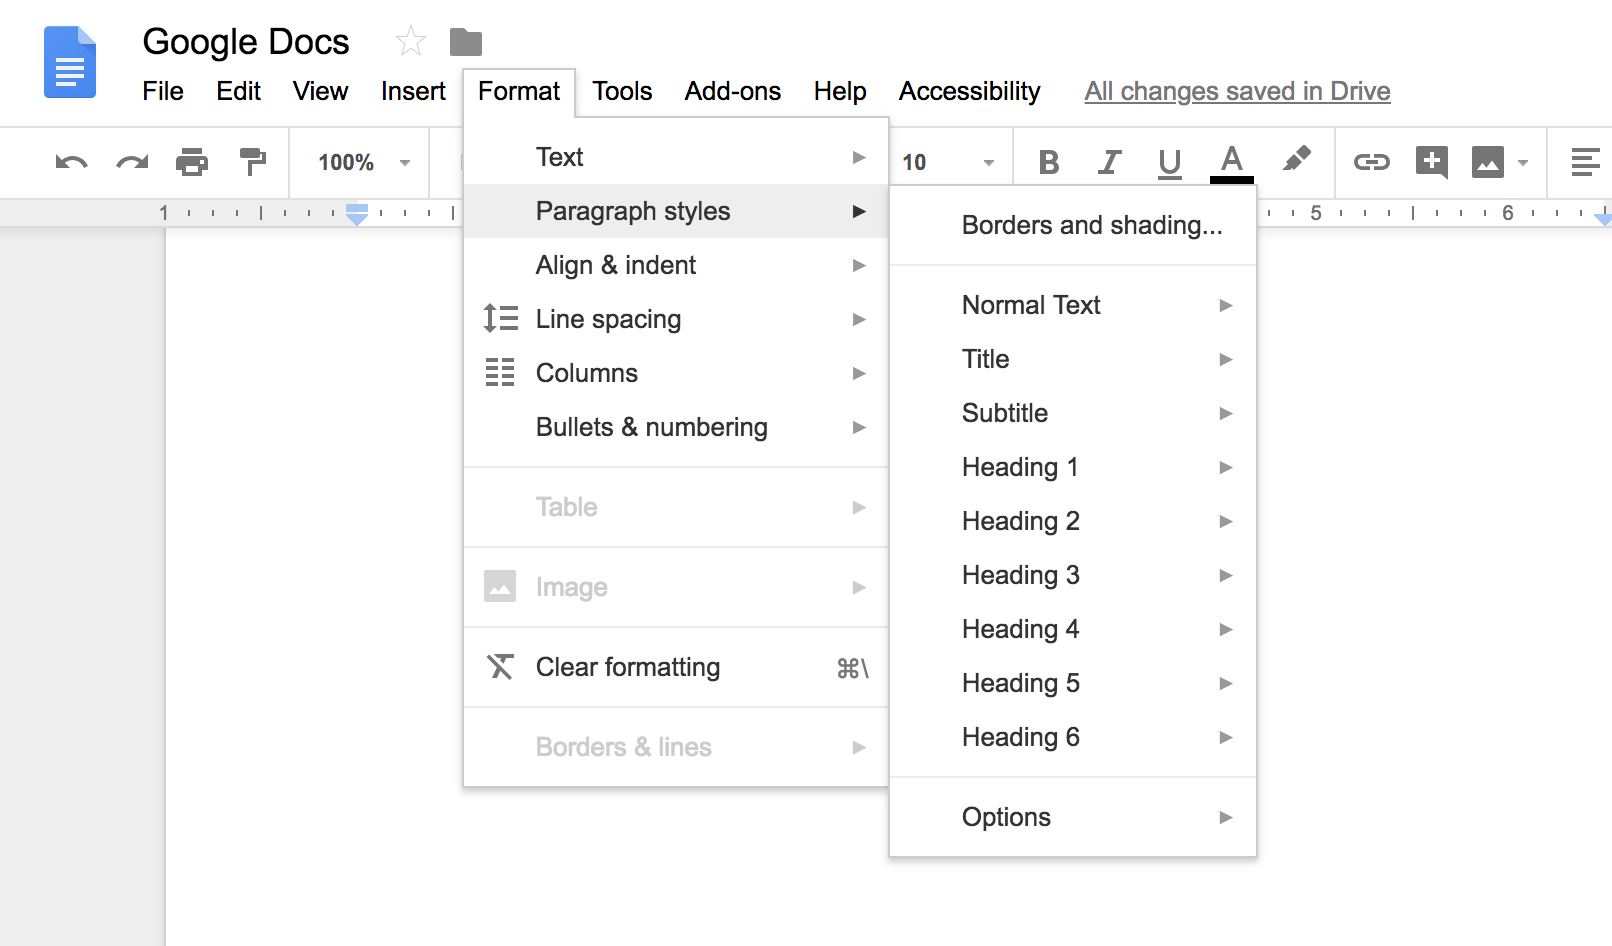
Google Docs includes a feature called paragraph styles that will allow you to properly structure content. You can access paragraph styles from the format menu in the main navigation or directly from the formatting ribbon. The default style is “Normal Text.” The normal text style should be used for basic paragraph text.

The title and subtitle styles should only be used for a document with a title page. Otherwise, the main heading of the document should be “Heading 1.” Subheadings under Heading 1 (H1) of the same importance should be Heading 2 (H2). Subheadings under H2 of the same importance should be Heading 3, and so on. No more than 6 levels of headings should be used (H1 - H6).
Outline View
Once a heading structure is created, you can view the document in an outline format.
- Select the document icon that is in the left-hand margin.
- On the left-hand side, an outline of the document will open. Note that this is only effective when a heading structure is in place.
Apply Paragraph Styles Text
These directions assume that no styles have been applied. Do not worry about what the visual style is—you can customize this later (see the Customize Paragraph Styles section below).
- Select all of the text in the document and choose “Normal text” from the styles menu.
- Select the text that serves as the main heading of the document. Choose “Heading 1” from the styles menu.
- Select each subheading, then select “Heading 2” from the styles menu.
- Highlight any text that is meant to be a list.
- If the list is meant to be sequential choose a numbered list from the format menu under Bullets & numbering.
- If the list is not sequential choose bulleted list from the format menu under Bullets & numbering.
Pro Tip
- Select the style you want to apply before adding new content to save a step. For example, select “Heading 2” from the styles menu before typing in the subheadings.
Customize Paragraph Styles
It is possible to change the default styles associated with your Google Docs account and/or within a specific document. For example, you can change the font, size and spacing associated with the “Normal Text” style or any of the headings.
- Highlight text with the style you want to modify applied (i.e. if you want to change the “Normal Text” style, select paragraph text with that style already applied).
- To Modify the size, font, or spacing.
- Select the specific style, like “Normal Text”, from the paragraph styles menu.
Formatting Tips
- Paragraph text should be 12pts or larger.
- Heading text should be 14pts or larger. Generally, Heading 1 should have the largest font, Heading 2 should have the next largest font, and so on.
- Small print should be 10pts or larger.
- The space after a heading should be slightly less than the space above the heading. To change the spacing select line-spacing from the format menu then choose add or remove space before or after the element.
- Don’t use more than one font.
- Use a font designed for the screen like Georgia, Verdana, Droid Sans, Droid Serif, Montserrat, Roboto, or Source Sans.
Pro Tip
- If you like the styles you have set and want to reuse them in each new document you create you can save them as your default styles. To do so, select ‘Paragraph styles’ from the Format menu then choose Options and then “Save as my default styles.”
Provide Text Equivalents with Alt Text
All images in a Google Doc should have alternative text assigned.
- Select an image in your document.
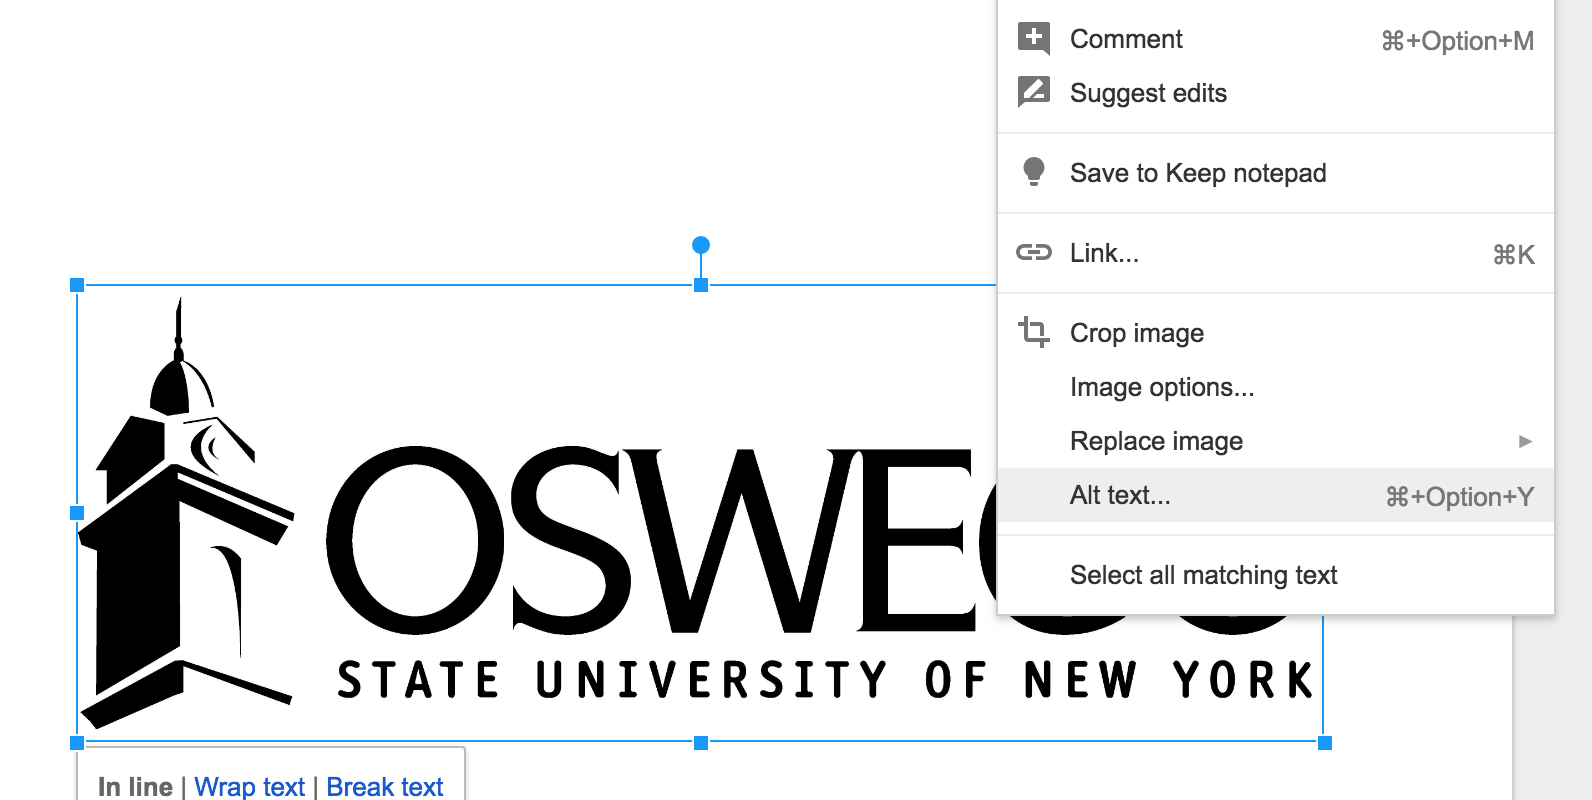
- Right click the image then choose “Alt text.”
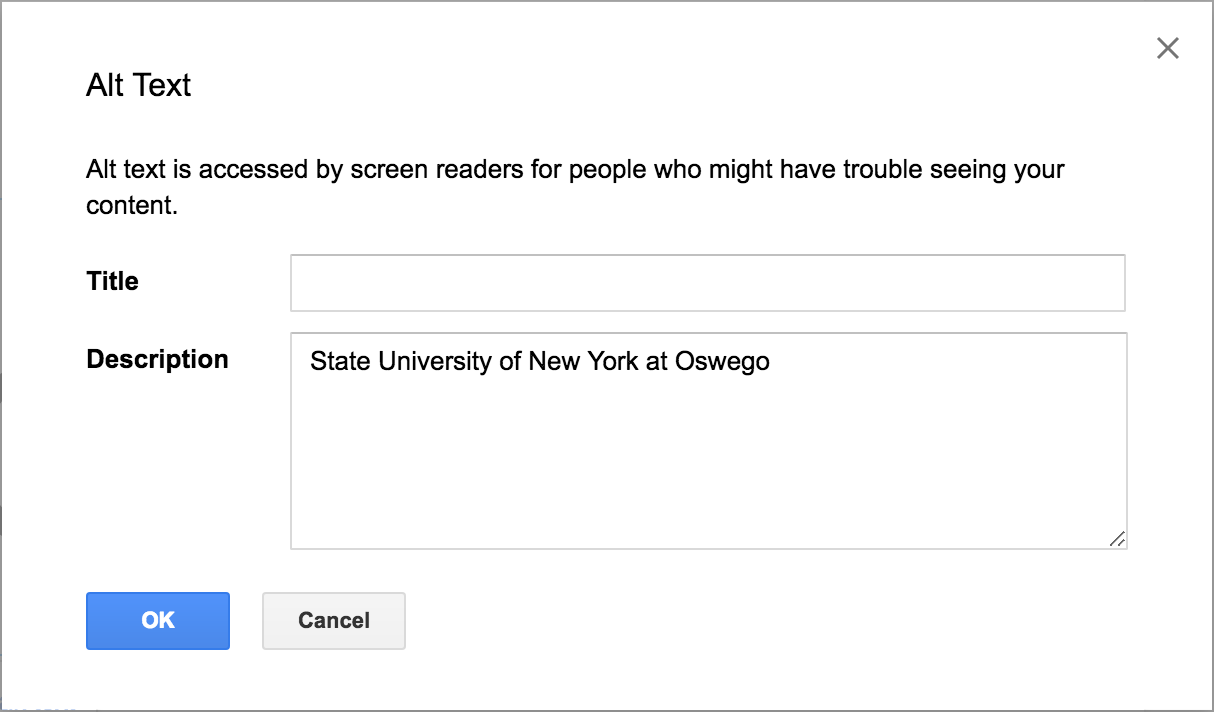
- Provide a full description in the “description” box. In the case of the SUNY Oswego logo you would write “State University of New York at Oswego.” If the image is more complex, like a chart, provide a title for the chart in the “title” box and a full description of the chart in the “description” box.
Using Columns
Due to the complexity of accessibility issues, it is not recommended to use tables. Setting up columns is easier and more readily inclusive. Be sure to use the true Columns function in Google Docs rather than making them manually. In the example image below, compare how the table and the columns look.
To create columns:
- Highlight the information you would like placed in columns.
- From the Format tab, choose Columns.
- Select the number of columns you’d like.
Formatting Tip:
- Styles can be applied to any information in columns, so headings and subheadings can be created.
Creating Accessible Tables
Tables should be used for tabular data, not layout purposes. Screen readers identify the number of columns and rows in a data table, read column and row headers, and provide table navigation. Proper markup allows screen readers to navigate through a table one cell at a time.
- From the main menu, select the Insert tab
- Select Table. A drop-down table and menu will appear.
- Highlight the number of rows and columns you’d like in the table. Click on the grid to place the table in the document.
- Use the tab key to move from cell to cell and enter in all appropriate information
You can style information within the table.
- Highlight the row or cells to be styled
- Select the Styles drop-down menu and choose the appropriate heading style or other appropriate font attributes
- Other styles can be added as well for added visual effects, such as background color, text color, border thickness, etc.
Headers must be properly set in table to allow assistive technology to correctly identify and navigate the table information. Styling within table cells does not define headers. To properly set header rows, see the Run Grackle Docs section.
Provide Descriptive Hyperlinks
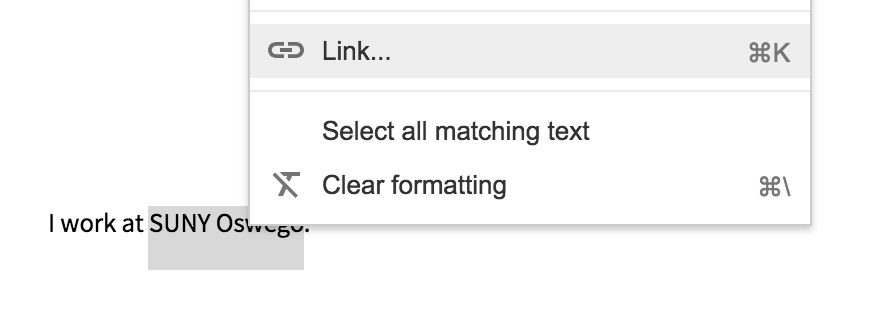
Hyperlinks in an electronic document should be embedded within the text to aid in readability and accessibility. Imagine you have the sentence “I work at SUNY Oswego” in your document and you want the words SUNY Oswego to link directly to the college’s website.
- Select the text you would like to convert to a hyperlink (in this example, SUNY Oswego).
- Right-click and select “Link” or choose “Link” from the Insert Menu.
- In the dialog box, include the full URL in the link field (in this case, https://oswego.edu).
- Select “Apply.”

Run an accessibility check
Grackle is the add-on accessibility checker for Google suite applications.
Install Grackle Docs
You only need to install the Grackle Docs accessibility checker once. It will always be available to you in Google Docs once you have installed it, even if you use a different computer.
- Select “Get Add-ons” from the Add-ons menu.
- Search “Grackle” in the dialog box.
- Select “+ Free” option to install.
- An alert will pop up alerting you that Grackle would like access to your Google Docs. You will need to confirm that you trust Grackle by selecting “Allow.” This completes the installation.

Run Grackle Docs
Before you distribute an electronic document, run the Grackle Docs accessibility checker to make sure you haven’t overlooked any accessibility details.
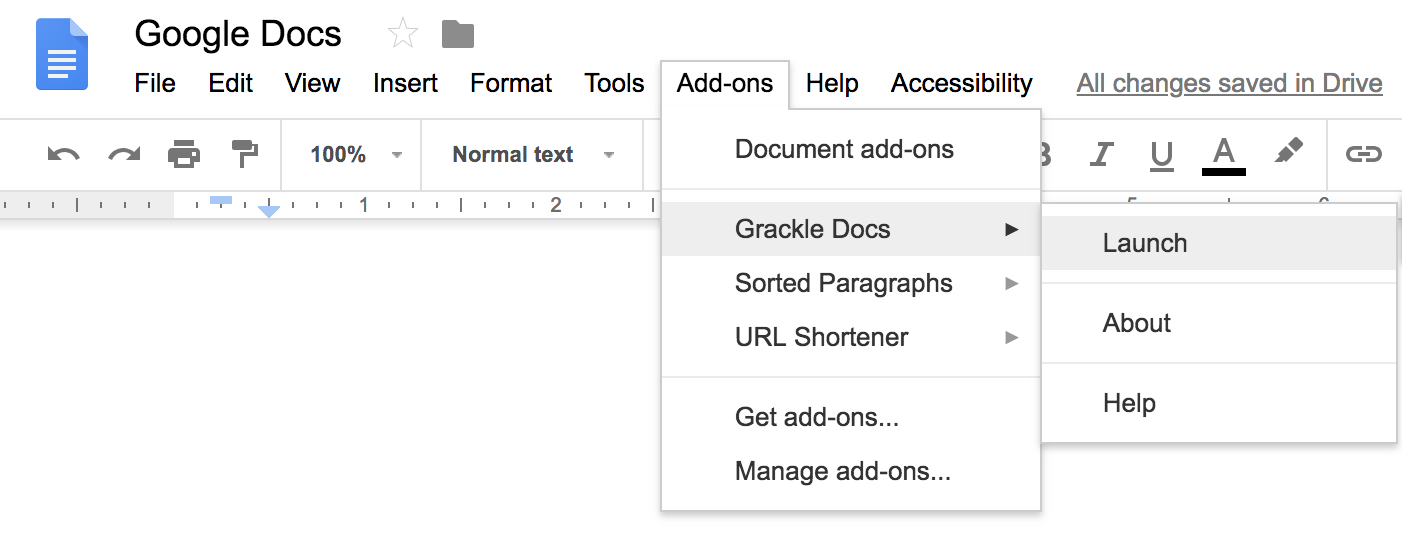
- From the Add-ons menu, select Grackle Docs, then launch.
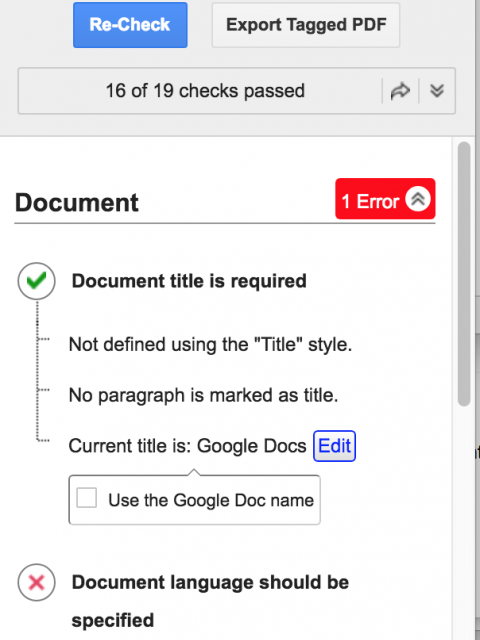
- A sidebar will open up that will identify errors and warnings.
- Click on each error for guidance on how to resolve each issue. Document title and document language commonly appear as errors but are really easy to resolve with the tools Grackle Docs provides.
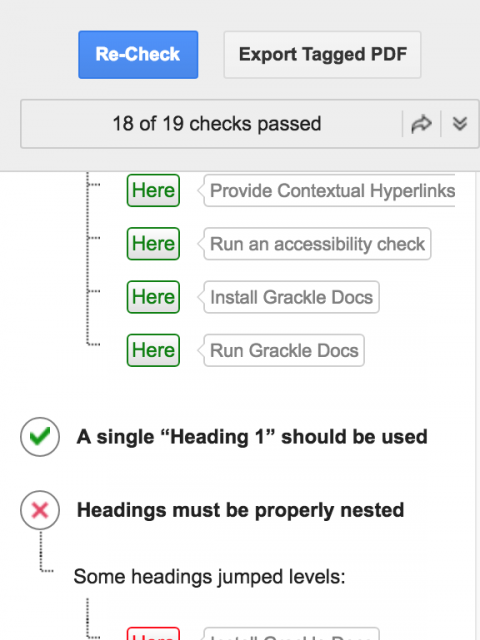
- Clicking the “Here” button on any flagged item will take you to that item in your document to review.
- Missing alt text will also be alerted. This tool will give you the option to mark decorative images (that would normally have empty alt text) as “artifacts” so that they are removed from the view of screen readers and other assistive technologies.
- Missing table headers will also be flagged. Click on the "Tag" button associated with a table to define the first row and/or first column as headers.
- Address each issue one at a time throughout the document.
- Select the “Re-Check” button at the top of the window when you have completed each task to receive an updated report.
- Continue to revise until all checks have passed.
Exporting and Downloading Google Doc
When you convert a Google Doc to another format, like a PDF or a Microsoft Word Document, it is important to note that your document may not be fully accessible in the new format (even if the Google Doc is). If you convert your document to a PDF, be sure to review and revise that document in Adobe Acrobat Pro with its built-in accessibility checker (See Adobe Acrobat PDF tutorial). If you convert your document to a Microsoft Word file, be sure to review that document in Microsoft Word with the built-in accessibility checker (see Microsoft Word tutorial). Fix any flagged issues before distributing the document in its new format.
Additional Resources
- Accessibility for Docs Editors (Google Support). This includes instructions on how to do many of these tasks on the Android, iPhone and iPad versions of the software.
- For help on the paragraph styles use the Add a title heading or table of contents in a document tutorial (Google Support). This includes help with the Android, iPhone and iPad versions of the software.
- Grackle Docs Short Overview (Grackle Docs) is a short video that demonstrates how to use the Grackle Docs accessibility checker (called Grackle Talks in the video), including how to successfully preserve accessibility features when exporting as a PDF.